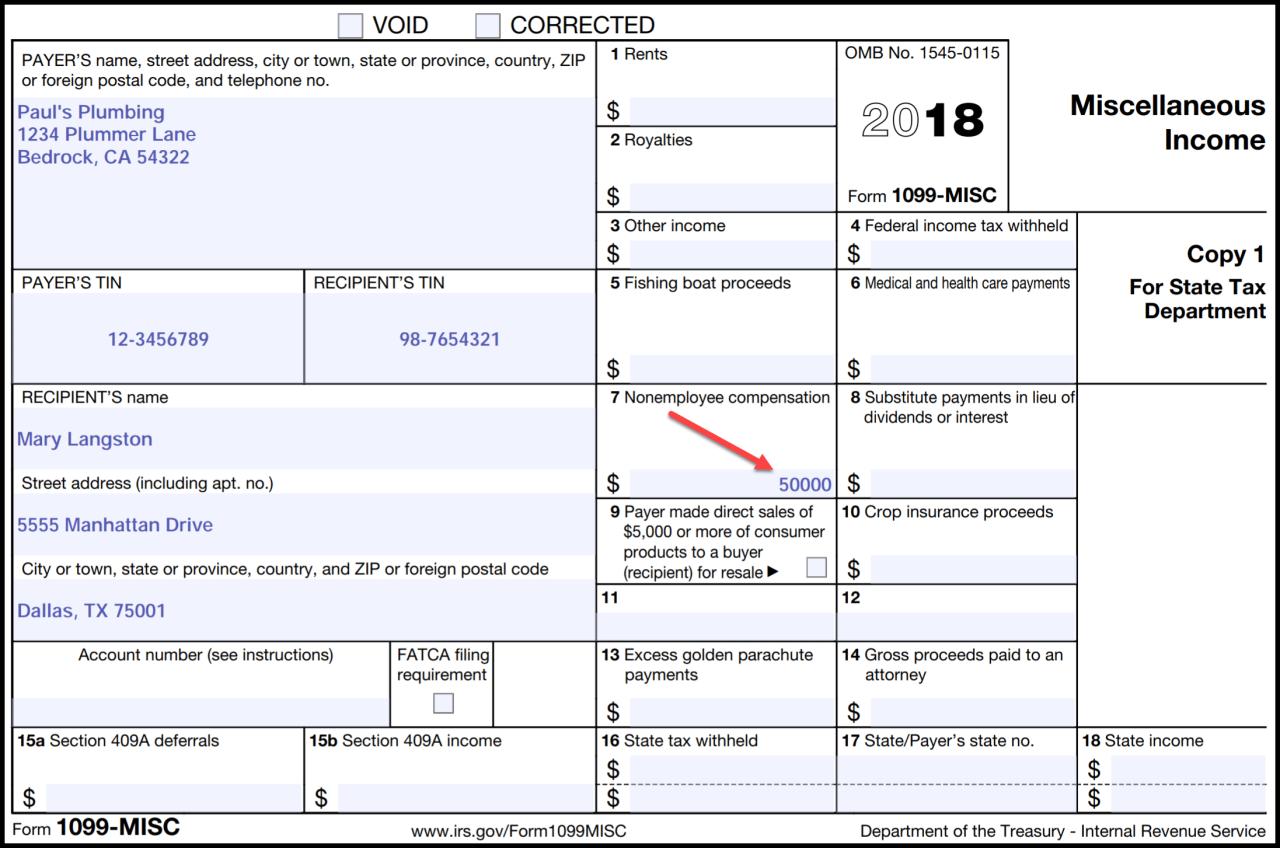
A 1099 document is a tax form used to report income that is not subject to withholding. This includes income from self-employment, dividends, and interest. The form is used to report the amount of income received, as well as any taxes that have been withheld.
Who Needs to File a 1099 Form?
Any person or business that makes payments to another person or business that total $600 or more in a calendar year must file a 1099 form. This includes payments for:
Self-employment income
Dividends
Interest
Rents
Royalties
Prizes and awards
Nonemployee compensation
What are the Different Types of 1099 Forms?
There are several different types of 1099 forms, each of which is used to report a different type of income. The most common types of 1099 forms include:
Form 1099-NEC: This form is used to report nonemployee compensation. This includes payments made to independent contractors, freelancers, and other individuals who are not considered employees.
Form 1099-INT: This form is used to report interest income. This includes interest earned on savings accounts, certificates of deposit, and bonds.
Form 1099-DIV: This form is used to report dividend income. This includes dividends paid on stocks and mutual funds.
Form 1099-R: This form is used to report retirement income. This includes distributions from IRAs, 401(k) plans, and pensions.
Form 1099-G: This form is used to report government payments. This includes unemployment benefits, Social Security benefits, and tax refunds.
How to File a 1099 Form
1099 forms can be filed electronically or by mail. The deadline for filing 1099 forms is January 31st of the year following the year in which the income was received.
Penalties for Failing to File a 1099 Form
Failure to file a 1099 form can result in penalties. The penalty for failing to file a 1099 form on time is $250 per form. The penalty for failing to file a 1099 form at all is $500 per form.
Conclusion
1099 forms are used to report income that is not subject to withholding. These forms must be filed by any person or business that makes payments to another person or business that total $600 or more in a calendar year. There are several different types of 1099 forms, each of which is used to report a different type of income. The deadline for filing 1099 forms is January 31st of the year following the year in which the income was received. Failure to file a 1099 form can result in penalties.
Understanding Form I-9: Employment Eligibility Verification
Introduction
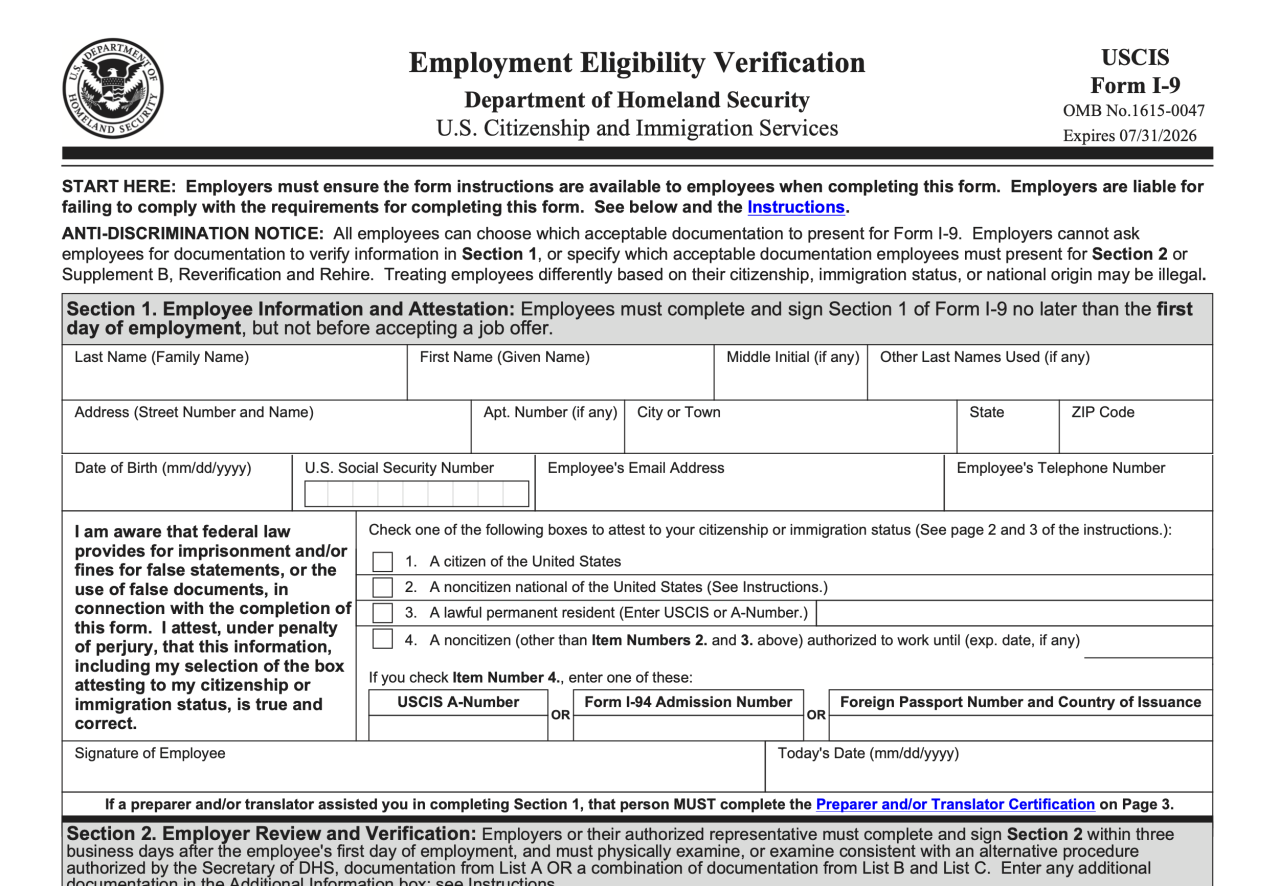
Form I-9, Employment Eligibility Verification, is a crucial document that employers in the United States utilize to confirm the employment eligibility of their newly hired workers. This comprehensive guide delves into the intricacies of Form I-9, encompassing its significance, completion guidelines, retention requirements, and the penalties associated with noncompliance.
Significance of Form I-9
Form I-9 serves multiple vital purposes:
Verification of Employment Eligibility: It enables employers to ascertain that their employees are authorized to work in the United States.
Prevention of Discrimination: By requiring employers to verify employment eligibility uniformly for all hires, Form I-9 helps prevent discrimination in employment based on national origin or citizenship status.
Compliance with Federal Law: Completing and retaining Form I-9 is a legal requirement for all employers in the United States, as mandated by the Immigration Reform and Control Act of 1986 (IRCA).
Completing Form I-9
The process of completing Form I-9 involves two distinct sections:
Section 1:
Employee’s Information: In this section, employees furnish personal details such as their name, address, date of birth, and Social Security number (if applicable).
Employment Authorization: Employees must provide documentation establishing their authorization to work in the United States. Acceptable documents fall into three categories:
List A: Documents that establish both identity and employment authorization, such as a U.S. passport or a Permanent Resident Card.
List B: Documents that establish identity, such as a driver’s license or a state-issued ID card, along with documents that establish employment authorization, such as a Social Security card or an Employment Authorization Document (EAD).
List C: Documents that establish both identity and employment authorization, but are only acceptable for non-U.S. citizens, such as a foreign passport with an appropriate visa or a Transportation Worker Identification Credential (TWIC).
Section 2:
Employer’s Responsibilities: Employers must examine the employee’s original documents, record the document information, and sign and date the form.
Employee’s Attestation: Employees must attest under penalty of perjury that they are authorized to work in the United States and that the documents they have presented are genuine and belong to them.
Retention Requirements
Employers are required to retain completed Form I-9s for a specific period:
Three Years After the Date of Hire: For employees who are still employed by the company.
One Year After the Date of Termination: For employees who have left the company.
Penalties for Noncompliance
Failure to comply with Form I-9 requirements can lead to substantial penalties:
Fines: Employers may be subject to fines ranging from $216 to $2,156 per unauthorized employee.
Back Taxes: Employers may be liable for back taxes, including Social Security and Medicare taxes, for unauthorized employees.
Criminal Charges: In severe cases, employers may face criminal prosecution, including imprisonment, for knowingly hiring unauthorized workers.
Conclusion
Form I-9 plays a pivotal role in ensuring a lawful and discrimination-free workforce in the United States. Employers must adhere to the guidelines and requirements outlined in this document to verify the employment eligibility of their employees and avoid potential legal consequences. Regular updates and guidance from the U.S. Citizenship and Immigration Services (USCIS) should be monitored to stay informed of any changes or modifications to Form I-9 regulations.
Scanning Documents with iPhone: A Comprehensive Guide
Scanning documents with an iPhone has become a convenient and efficient way to digitize physical documents and make them easily accessible on your mobile device. With the advancements in mobile technology, iPhones now come equipped with powerful cameras and built-in scanning features that allow users to quickly capture and convert paper documents into digital copies.
Benefits of Scanning Documents with iPhone
There are numerous benefits to scanning documents with an iPhone, including:
1. Portability: iPhones are highly portable devices that can be easily carried wherever you go. This makes it convenient to scan documents on the move, whether you’re at home, in the office, or traveling.
2. Convenience: Scanning documents with an iPhone is a quick and easy process. With just a few taps, you can capture a high-quality image of a document and convert it into a digital format.
3. Accessibility: Once scanned, documents are easily accessible on your iPhone and can be shared with others via email, messaging apps, or cloud storage.
4. Organization: Scanning documents allows you to organize and store them digitally, making it easier to find and retrieve them when needed.
5. Security: Digital documents are more secure than physical documents, as they can be password-protected and stored in encrypted formats.
How to Scan Documents with iPhone
Scanning documents with an iPhone is a straightforward process that can be completed in a few simple steps:
1. Open the Notes App: On your iPhone, open the Notes app, which is a pre-installed app on all iPhones.
2. Create a New Note: Tap the "New Note" button to create a new note.
3. Access the Document Scanner: Tap the "+" icon in the toolbar and select "Scan Documents."
4. Position the Document: Place the document you want to scan within the frame displayed on your iPhone’s screen. Make sure the entire document is visible and well-lit.
5. Capture the Image: Tap the shutter button to capture an image of the document. You can also adjust the scan area by dragging the corners of the frame.
6. Enhance the Scan: After capturing the image, you can enhance the scan by adjusting the contrast, brightness, and color. You can also crop the image to remove unnecessary parts.
7. Save the Scan: Once you are satisfied with the scan, tap the "Save" button to save the scanned document as an image or PDF file.
8. Share or Export: After saving the scanned document, you can share it with others via email, messaging apps, or cloud storage. You can also export the document to other apps on your iPhone.
Tips for Better Scanning Results
Here are a few tips for achieving better scanning results with your iPhone:
1. Use Good Lighting: Ensure that the document is well-lit to avoid shadows and poor image quality.
2. Place the Document Flat: Make sure the document is placed flat on a stable surface to prevent blurry images.
3. Avoid Clutter: Remove any unnecessary objects or clutter from the background to ensure the document is the sole focus of the scan.
4. Steady Your Hand: Hold your iPhone steady while capturing the image to prevent blurry scans. Use a tripod or a steady surface if necessary.
5. Clean the Camera Lens: Keep the camera lens of your iPhone clean to ensure clear and sharp scans.
Recommended Apps for Scanning Documents with iPhone
In addition to the built-in scanning feature in the Notes app, there are several other highly rated apps available in the App Store that offer enhanced scanning capabilities:
1. Adobe Scan: This popular app offers advanced features like OCR (optical character recognition) for converting scanned text into editable text, multi-page scanning, and cloud integration.
2. CamScanner: CamScanner is another popular choice that provides features like automatic border detection, document enhancement, and the ability to sign and share scanned documents.
3. Evernote Scannable: This app is known for its simplicity and ease of use. It offers quick scanning, OCR, and the ability to organize your scanned documents into notebooks.
4. Microsoft Office Lens: This app from Microsoft is designed for business professionals and students. It offers features like whiteboard scanning, business card scanning, and integration with Microsoft Office apps.
5. Genius Scan: Genius Scan is a feature-rich app that offers advanced scanning modes, OCR, cloud integration, and the ability to export scanned documents in various formats.
Conclusion
Scanning documents with an iPhone is a convenient and efficient way to digitize physical documents and make them easily accessible on your mobile device. With the built-in scanning feature in the Notes app and various third-party apps available in the App Store, users have a variety of options to choose from. By following the tips and recommendations mentioned in this guide, you can achieve high-quality scans and effectively manage your digital documents using your iPhone.
In today’s digital world, Portable Document Format (PDF) has become the de facto standard for sharing and storing documents. Its ability to preserve the original formatting, graphics, and layout makes it an ideal choice for official documents, contracts, and presentations. However, the need to edit or repurpose these PDF files often arises, and that’s where the conversion to Microsoft Word format comes into play.
Methods for Converting PDF to Word
There are several methods available to convert PDF documents to Word, each with its own advantages and drawbacks. Let’s explore the most common ones:
Using Online PDF to Word Converters
Online PDF to Word converters offer a quick and convenient way to convert documents without the need for additional software installation. These web-based tools typically have a user-friendly interface, allowing users to upload their PDF files and download the converted Word document in a matter of minutes. Some popular online PDF to Word converters include:
Adobe Acrobat Online: This tool is offered by Adobe, the creator of the PDF format, and provides accurate conversions while preserving the original formatting and layout.
Smallpdf: Known for its simplicity and speed, Smallpdf allows users to convert PDF to Word with a few clicks.
Zamzar: Zamzar is a versatile online converter that supports various file formats, including PDF to Word conversion.
Utilizing Desktop PDF to Word Converters
Desktop PDF to Word converters are software programs installed on your computer, providing more advanced features and customization options compared to online converters. These programs typically offer batch conversion, allowing users to convert multiple PDF files simultaneously, and provide more control over the conversion process. Some notable desktop PDF to Word converters include:
Adobe Acrobat Pro: As the paid version of Adobe Acrobat, Acrobat Pro offers a comprehensive suite of PDF editing and conversion tools, including accurate PDF to Word conversions.
Nuance Power PDF: Power PDF is a feature-rich alternative to Adobe Acrobat, known for its OCR (Optical Character Recognition) capabilities, enabling users to convert scanned PDF documents to editable Word files.
Nitro Pro: Nitro Pro is another robust PDF editor and converter that provides fast and reliable PDF to Word conversions while preserving the original formatting.
Employing Microsoft Word’s Built-In Conversion Feature
Microsoft Word has a built-in feature that allows users to open and convert PDF files directly within the application. This method is straightforward and convenient, especially for those who already have Microsoft Word installed on their computers. To use this feature:
Open Microsoft Word.
Click the “File” tab in the top-left corner.
Select “Open” from the left pane.
In the “File Open” dialog box, navigate to the PDF file you want to convert.
Click the “Open” button.
A message will appear, asking you to confirm the conversion. Click “OK.”
Choosing the Right Conversion Method
The best method for converting PDF to Word depends on your specific needs and preferences. Consider the following factors when making your choice:
Accuracy and Formatting Preservation
If accuracy and preserving the original formatting are of utmost importance, opting for a paid desktop converter like Adobe Acrobat Pro or Nuance Power PDF is recommended. These programs typically employ advanced conversion algorithms that ensure faithful reproduction of the original document.
Batch Conversion
If you need to convert multiple PDF files simultaneously, a desktop PDF to Word converter or an online converter that supports batch conversion is the way to go. Batch conversion can save you time and effort, especially when dealing with large volumes of documents.
Accessibility and Convenience
For quick and easy conversions without the need for software installation, online PDF to Word converters are a great option. They are accessible from any device with an internet connection, making them ideal for users on the go or those who prefer not to install additional software on their computers.
Additional Tips for Successful PDF to Word Conversion
To ensure a successful PDF to Word conversion, follow these tips:
Use High-Quality PDF Files
The quality of the input PDF file plays a significant role in the conversion outcome. Ensure that the original PDF file is clear, legible, and free of errors. Poor-quality PDF files may result in conversion issues or inaccuracies.
Edit Converted Word Documents
Once the PDF file is converted to Word, it’s a good practice to review and edit the document to ensure accuracy. The conversion process, while generally reliable, may introduce minor formatting or content errors that need to be corrected.
Leverage OCR for Scanned PDFs
If you’re working with scanned PDF documents, consider using an OCR-enabled PDF to Word converter. OCR technology allows the program to recognize and convert text from scanned images, making them editable in Word.
Conclusion
Converting PDF documents to Word is a common task in the digital age, and there are various methods available to accomplish this. By understanding the different conversion methods, their advantages, and limitations, you can choose the best approach that suits your specific needs. Whether you prefer the convenience of online converters, the advanced features of desktop programs, or the simplicity of Microsoft Word’s built-in conversion feature, there’s a solution that will help you convert your PDF documents to Word efficiently and effectively.
Understanding the Purpose and Significance of Form K-1
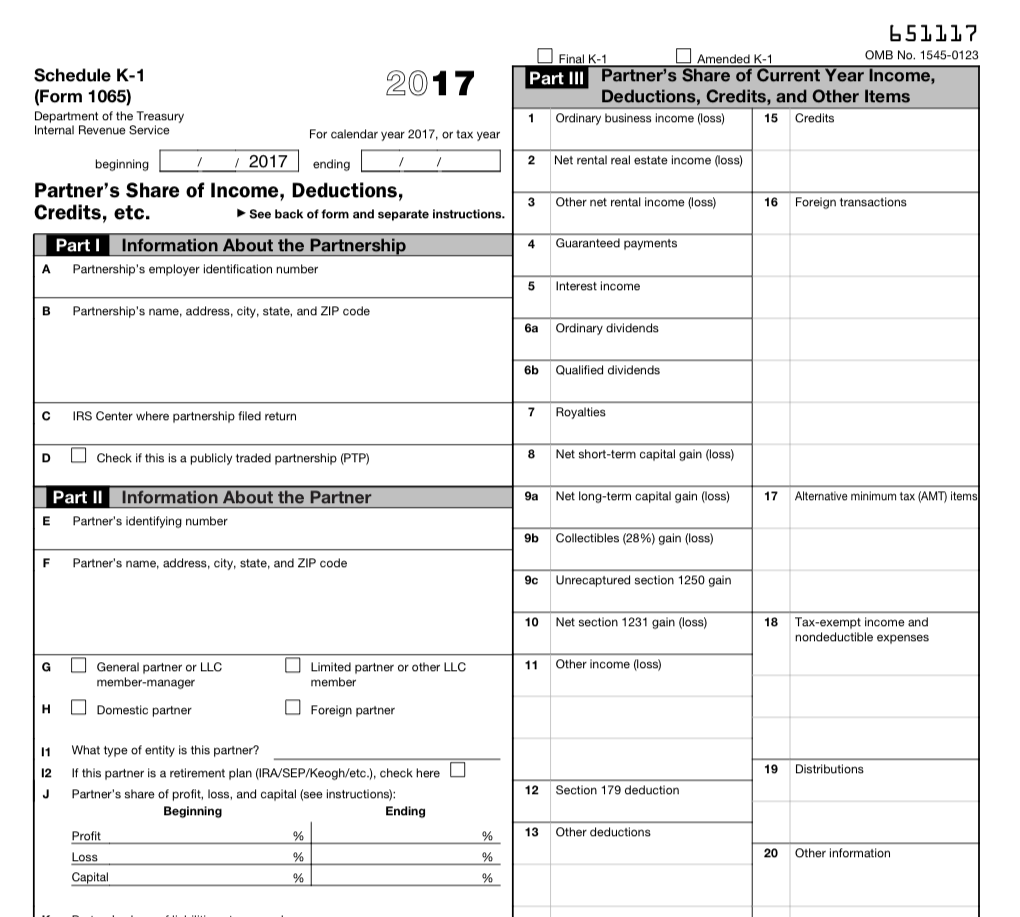
Form K-1 is an intricate tax document issued annually by partnerships, S corporations, limited liability companies (LLCs), and other pass-through entities to their individual partners or shareholders. It serves as a crucial tool for reporting each partner’s or shareholder’s share of income, deductions, credits, and other tax-related information. Understanding this document is essential for accurately preparing and filing individual tax returns.
Who Receives Form K-1?
Partnerships: Each partner receives a Schedule K-1 from the partnership.
S Corporations: Shareholders of an S corporation receive a Schedule K-1.
Limited Liability Companies (LLCs): If an LLC elects to be taxed as a partnership, its members receive Schedule K-1s.
Trusts and Estates: Beneficiaries of trusts and estates may receive Schedule K-1s.
Deciphering the Sections of Form K-1
Form K-1 consists of multiple sections, each containing specific information. Here’s a breakdown of the key sections:
Section I: Partner’s Share of Income, Deductions, Credits, etc.
Line 1: Ordinary Income: Reports the partner’s share of ordinary income or loss.
Line 2: Net Income or Loss: Reflects the partner’s net income or loss from the partnership.
Line 3: Capital Gain or Loss: Shows the partner’s share of capital gains or losses.
Line 4: Other Income or Loss: Includes other income or loss items not specified elsewhere.
Section II: Partner’s Distributive Share of Credits
Line 5: Qualified Dividends: Reports the partner’s share of qualified dividends received by the partnership.
Line 6: Foreign Tax Credit: Reflects the partner’s share of foreign tax credits passed through from the partnership.
Line 7: Other Credits: Includes other credits passed through to the partners.
Section III: Partner’s Distributive Share of Nondeductible, Pass-Through Expenditures
Line 8: Nondeductible Expenses: Reports the partner’s share of nondeductible expenses incurred by the partnership.
Line 9: Depletion of Oil and Gas Wells: Shows the partner’s share of depletion deductions related to oil and gas wells.
Section IV: Capital Account Activity
Line 10: Beginning Capital Account: Reflects the partner’s capital account balance at the beginning of the tax year.
Line 11: Capital Contributions: Shows any capital contributions made by the partner during the tax year.
Line 12: Distributions: Includes any distributions received by the partner from the partnership.
Line 13: Ending Capital Account: Reports the partner’s capital account balance at the end of the tax year.
Reporting Form K-1 Information on Your Tax Return
Partners or shareholders must include information from their Form K-1 on their individual tax returns. Here’s how:
Partnerships
Schedule E (Form 1040): Partners report their share of partnership income and expenses on Schedule E.
Form 8955: Partners must file Form 8955 to report their share of passive income and losses.
S Corporations
Schedule E (Form 1040): Shareholders report their share of S corporation income and expenses on Schedule E.
Form 8995: Shareholders must file Form 8995 to report their share of passive income and losses.
LLCs
Schedule C (Form 1040): Members of an LLC taxed as a partnership report their share of LLC income and expenses on Schedule C.
Form 8955: Members must file Form 8955 to report their share of passive income and losses.
Deadlines for Filing Form K-1 and Related Tax Returns for 2023
Form K-1 Deadline
The due date for partnerships and S corporations to furnish Schedule K-1 to their partners or shareholders is:
March 15, 2023 for calendar year partnerships and S corporations.
Tax Return Deadlines
April 18, 2023: Due date for filing individual tax returns for calendar year taxpayers.
October 16, 2023: Extended due date for individual tax returns with an extension filed by April 18, 2023.
Seeking Professional Assistance
Taxpayers facing complexities related to Form K-1 or their tax returns should consult with a qualified tax professional, such as a certified public accountant (CPA) or enrolled agent (EA). These professionals can provide expert guidance, ensure accurate reporting, and help taxpayers avoid potential penalties.
Staying Informed: Latest Updates and Resources
IRS Website: The Internal Revenue Service (IRS) website offers comprehensive information, instructions, and forms related to Form K-1 and pass-through entities.
Tax Publications: The IRS publishes helpful tax publications, including Publication 569: Miscellaneous Deductions, which provides detailed guidance on reporting pass-through entity income and expenses.
Conclusion
Form K-1 plays a crucial role in reporting income, deductions, credits, and other tax-related information from pass-through entities to their partners or shareholders. Thoroughly understanding this document and accurately reporting the information on individual tax returns is essential for complying with tax laws and avoiding potential issues. Individuals seeking assistance should consult with a qualified tax professional for expert guidance and support.
The Department of Defense (DoD) is one of the largest and most complex organizations in the world, employing millions of people in various capacities. To maintain the security and integrity of its operations, the DoD has established rigorous standards for employee identification.
Photo: stories on freepik.com
In this article, we will explore the standard form of identification for DoD employees and delve into the various components and security measures in place. We will draw information from sources such as Brainly and Quizlet, while also incorporating additional insights to provide a comprehensive understanding of this critical aspect of DoD security.
1. The Need for Secure Identification
The DoD’s need for secure identification is paramount. It operates a vast network of facilities, from military bases to research institutions, and its employees work on a wide range of classified and sensitive projects. Ensuring that only authorized personnel have access to specific areas, information, and resources is a fundamental security concern.
2. Common Components of DoD Employee Identification
According to the sources provided, there are several components commonly found in the standard form of identification for DoD employees:
1. Photograph
A photograph of the employee is typically a prominent feature of the identification card. This helps security personnel quickly verify the identity of the cardholder and determine whether they match the image on the card.
2. Employee Name and Affiliation
The employee’s full name and affiliation with the DoD are usually printed on the card. This information clarifies the individual’s role and responsibilities within the organization.
3. Personal Identifiers
Personal identifiers, such as the employee’s ID number or a unique serial number, serve as a primary means of tracking and verifying an individual’s identity. They are essential for record-keeping and security checks.
4. Barcode or Magnetic Stripe
To facilitate electronic access control and record-keeping, the identification card often includes a barcode or magnetic stripe. These technologies allow for quick scanning and validation of the cardholder’s status and permissions.
5. Security Features
Security features, such as holograms, watermarks, and other anti-counterfeiting measures, are incorporated to prevent fraudulent reproduction of the card.
3. DoD’s Commitment to Security Awareness
The DoD’s commitment to security awareness is evident in its requirement for annual security awareness refresher training. This training ensures that all employees remain knowledgeable about security protocols and the importance of safeguarding their identification cards. The Quizlet source you provided likely contains flashcards related to this training, helping employees stay informed and vigilant.
4. Types of DoD Employee Identification Cards
DoD issues various types of identification cards, each serving different purposes and granting different levels of access. These cards include:
1. Common Access Card (CAC)
The Common Access Card is the most well-known type of identification within the DoD. It serves as both an ID card and an authentication device, allowing access to computer networks, secure facilities, and encrypted communications.
2. Military ID Card
Military ID cards are issued to active-duty military personnel, their dependents, and retired military members. These cards grant access to military installations and entitle cardholders to certain benefits and privileges.
3. Defense Civilian ID Card
Defense civilian employees receive a Defense Civilian ID Card, which identifies them as DoD employees. These cards typically include features like a photograph, name, affiliation, and personal identifier.
4. Contractor ID Card
Contractors working with the DoD are also issued identification cards, often known as Contractor ID Cards. These cards help distinguish them from military and civilian personnel and specify their level of access and permissions.
5. The Role of CAC in DoD Security
The Common Access Card (CAC) is a linchpin in DoD security. It has evolved into a multifunctional smart card that serves as both an identity card and a key to access various DoD systems. Here are some key aspects of the CAC’s role in security:
1. Authentication
The CAC is a powerful authentication tool. It includes a microprocessor chip and requires a Personal Identification Number (PIN) to unlock. This two-factor authentication system ensures that only authorized users can access sensitive DoD systems.
2. Digital Signatures
The CAC supports digital signatures, allowing DoD employees to securely sign electronic documents. This is invaluable for maintaining the integrity and authenticity of electronic records.
3. Physical Access Control
CACs are used for physical access control to DoD facilities. Cardholders can gain entry to secure areas by scanning their cards at access points, where the information is quickly verified against a secure database.
4. Secure Communication
The CAC facilitates secure communication, including email encryption and digital certificates for secure network access. This is crucial for protecting classified information and sensitive communications.
6. Security Measures to Protect DoD Identification Cards
Ensuring the security of identification cards is of utmost importance in the DoD. The Brainly source mentions that the DoD employs various security measures to safeguard these cards, including:
1. Personal Identification Number (PIN)
As mentioned earlier, the CAC requires a PIN for activation. This adds an extra layer of security to prevent unauthorized use in case the card is lost or stolen.
2. Card Activation and Deactivation
DoD identification cards can be remotely activated and deactivated, allowing quick response to security threats or the loss of a card.
3. Regular Renewal and Updates
Cards typically have expiration dates, and employees are required to renew them. This process ensures that the cards remain current and that outdated cards cannot be used maliciously.
4. Reporting Lost or Stolen Cards
Employees are responsible for reporting lost or stolen cards promptly. This triggers immediate deactivation and replacement.
5. Card Authentication
Cards are authenticated electronically by scanners and security systems, ensuring that only genuine cards are accepted.
7. The Future of DoD Identification
The DoD is continually adapting and improving its identification and security systems to stay ahead of evolving threats. While the sources provided offer valuable insights, it’s important to recognize that security measures and identification technology are subject to ongoing updates and advancements.
Biometric Authentication: The DoD is increasingly exploring biometric authentication methods, such as fingerprint and iris scans, to enhance security. These methods can further reduce the risk of unauthorized access.
Enhanced Smart Cards: Smart card technology is advancing, and future identification cards may incorporate even more sophisticated security features, such as advanced encryption and secure elements.
Mobile Authentication: The proliferation of smartphones has led to the development of mobile authentication apps that can supplement or even replace physical identification cards. This technology may become more prevalent in the DoD’s security framework.
Conclusion
The standard form of identification for DoD employees is a critical component of the organization’s overall security strategy. Through careful design, robust security measures, and employee training, the DoD ensures that only authorized personnel have access to classified information and secure facilities. The Common Access Card, in particular, plays a pivotal role in authentication, access control, and secure communication.
As the threat landscape evolves, the DoD is likely to continue enhancing its identification and security systems to adapt to new challenges. By staying vigilant, maintaining a commitment to security awareness, and leveraging advanced technology, the DoD aims to maintain the highest standards of security for its employees and its critical missions.
In the age of smartphones and digital communication, it is not uncommon to encounter crossword clues that seem to be ripped straight from the digital realm. “Letters in the corner of a phone screen” may initially appear cryptic, but it is a popular crossword clue that hints at a specific set of letters. It often leaves crossword enthusiasts scratching their heads as they attempt to decipher its meaning. In this article, we will explore this intriguing crossword clue, decipher its purpose, and shed light on the letters hiding in the corners of your phone screen.
Photo: pvproductions on freepik.com
The Crossword Clue
Crossword puzzles are a beloved pastime for many, offering a mental challenge that stimulates the mind and entertains for hours. Clues in crossword puzzles can be straightforward or enigmatic, often requiring a combination of wordplay and lateral thinking. The clue, “letters in the corner of a phone screen,” is an excellent example of the latter.
This clue is known for its clever wordplay. It is not about actual letters that you might find in the physical corners of a phone screen. Instead, it alludes to the “qwerty” arrangement of letters on a standard keyboard, where the letters Q, W, E, R, T, Y occupy the top-left corner of the layout. This crossword clue is a playful way to reference these particular letters, often without mentioning them explicitly.
The crossword clue “letters in the corner of a phone screen” can be misleading, especially for those who are not well-versed in crossword puzzle conventions. But once you understand the intended reference, it becomes clear and opens up a world of crossword-solving possibilities.
Decoding the Wordplay
Crossword puzzles thrive on wordplay, puns, and clever associations. The “letters in the corner of a phone screen” crossword clue is a prime example of how cryptic and entertaining these word games can be. To decode the clue, it is essential to grasp the following elements:
Letters: The word “letters” in the clue refers to the characters on a keyboard. Keyboards on smartphones, tablets, and computers often have a standard layout known as the QWERTY keyboard. This layout gets its name from the first six letters on the top row: Q, W, E, R, T, and Y.
Corner: The term “corner” suggests that these letters are located at the top-left corner of the keyboard layout. It’s a playful way of describing their position.
Phone Screen: This part of the clue adds a layer of misdirection. It may lead you to think the reference is about something physically on your phone screen, but it’s a subtle hint that it’s related to the digital aspect of the device – the keyboard layout on a touchscreen.
Once you understand these elements, you’ll see that the “letters in the corner of a phone screen” simply means the letters Q, W, E, R, T, and Y, which are indeed located in the top-left corner of a standard QWERTY keyboard layout on a phone.
The QWERTY Keyboard
Now that we’ve deciphered the “letters in the corner of a phone screen” crossword clue, let’s take a closer look at the QWERTY keyboard itself. This ubiquitous keyboard layout is not exclusive to phone screens but is also found on computer keyboards and various digital devices. Understanding its history and layout is essential for solving crossword puzzles and for comprehending the clue’s reference.
The QWERTY keyboard layout was patented in 1868 by Christopher Sholes, an American newspaper editor and printer. It was designed for Sholes’ invention, the Sholes and Glidden typewriter, which became the first commercially successful typewriter. Sholes’ layout aimed to minimize the problem of mechanical jams by placing frequently used letter pairs apart from each other.
The layout became popular, and when typewriters evolved into computer keyboards and, later, touchscreen keyboards on smartphones, the QWERTY layout endured. It’s known for its familiar arrangement of letters, with “QWERTY” being the first six characters in the top row.
The QWERTY keyboard is used worldwide and has become a standard input method for a wide range of digital devices, from personal computers to smartphones and tablets. Its legacy is so ingrained in modern technology that it has made its way into crossword puzzles as a clever reference.
Crossword Enigmas
Crossword puzzles often use wordplay, puns, and cryptic clues to challenge and entertain solvers. The “letters in the corner of a phone screen” is just one example of how crossword clues can play with language and associations. Here are a few other types of crossword enigmas that you might encounter:
Anagrams: Some crossword clues require you to rearrange the letters of a given word or phrase to form another word. These are often indicated by phrases like “scrambled,” “mixed up,” or “shuffled.”
Homophones: These clues rely on words that sound the same but have different meanings. For instance, a clue might use “flower” to hint at “flour” or “sew” to suggest “so.”
Double Meanings: Certain clues can have two valid interpretations. These clues often rely on words with multiple meanings or clever phrasing.
Reversals: Reversal clues hint that you should reverse the letters in a word or phrase. Common indicators include “about,” “over,” and “backwards.”
Cryptic Clues: Cryptic crosswords take wordplay to another level. They often include a combination of anagram clues, homophones, and double meanings, requiring a deep understanding of wordplay and lateral thinking.
Crossword puzzles are a delightful blend of language, logic, and creativity. They test your knowledge of vocabulary, wordplay, and your ability to think laterally. Solving these puzzles can be both rewarding and challenging, making the “letters in the corner of a phone screen” just one of many intriguing crossword enigmas to unravel.
Conclusion
The “letters in the corner of a phone screen” crossword clue serves as an excellent example of the clever wordplay often found in crossword puzzles. While it may initially perplex those who encounter it, understanding its reference to the QWERTY keyboard layout unlocks its true meaning.
Crossword puzzles are a fantastic way to engage the mind, expand one’s vocabulary, and have fun with language. In the case of this clue, the marriage of modern technology and traditional wordplay offers an entertaining twist that keeps crossword enthusiasts on their toes. So, the next time you come across a cryptic crossword clue like this one, remember to look beyond the surface and explore the creative wordplay that lies within. Happy puzzling!
In our digital age, we’re all looking for ways to save money, and innovative apps have made it easier than ever to do so. One such app that has gained popularity in recent years is Fetch Rewards. It’s an app that promises to reward you for simply taking photos of your grocery receipts. But have you ever wondered what happens with those receipts after you submit them to Fetch Rewards? In this article, we’ll dive into the inner workings of Fetch Rewards and explain how the app utilizes your receipts to provide you with rewards and valuable insights into your shopping habits.
Photo: vector4stock on freepik.com
What is Fetch Rewards?
Before we delve into how Fetch Rewards handles receipts, it’s essential to understand what Fetch Rewards is. Fetch Rewards is a mobile application that allows users to earn points (called “Fetch Points”) for making everyday purchases, especially grocery shopping. The process is simple: you shop for groceries at any store, take a photo of your receipt, and earn points that can be redeemed for gift cards or other rewards. But what exactly does Fetch Rewards do with those scanned receipts?
Receipt Scanning: The Heart of Fetch Rewards
Fetch Rewards primarily relies on the scanning of receipts as the core mechanism for its user rewards system. When you submit a receipt, the app’s technology processes the information on the receipt to extract relevant data. While the specifics of how Fetch Rewards processes this data may not be publicly disclosed, it is a combination of manual review and automated optical character recognition (OCR) technology.
Automated OCR technology is used to extract details like the store’s name, the items you purchased, their prices, and the purchase date. Manual review might come into play when OCR technology struggles with handwriting or other issues. This data is then used to determine how many Fetch Points you’ll earn from the receipt.
Earning Fetch Point
The number of Fetch Points you earn from a receipt is based on a combination of factors, including the total dollar amount spent, the brands and products you purchased, and any specific promotions or offers available on the app at the time. Different products and brands may have specific point values, and these values can change periodically.
Fetch Rewards offers a wide range of products that are eligible for points, from everyday groceries to specific brands and even special promotions. The app often features bonus point opportunities for certain products or combinations of products, so scanning your receipt at the right time can result in substantial point accumulation.
Why Does Fetch Rewards Want Your Receipts?
Now that we know how Fetch Rewards processes receipts, let’s discuss why they want your receipts in the first place. Fetch Rewards collects and analyzes this data for several reasons:
User Rewards: The primary reason Fetch Rewards wants your receipts is to reward you for your shopping. By collecting data on your purchases, they can determine the points you’ve earned and allow you to redeem those points for gift cards, discounts, and other rewards.
Market Research: Fetch Rewards collects data on the products you buy, the brands you prefer, and the stores you shop at. This information is valuable for companies and brands, as it helps them understand consumer behavior and trends. This data can be used to make informed decisions about product development, marketing strategies, and pricing.
Personalized Offers: By analyzing your shopping habits, Fetch Rewards can provide you with personalized offers and deals on products you’re likely to buy. This not only benefits you by saving money but also benefits the brands and stores by increasing sales.
Feedback to Retailers: Fetch Rewards can provide valuable insights to retailers about customer preferences, which can help them optimize their inventory and better serve their customers. It can also help retailers assess the effectiveness of their marketing campaigns and promotions.
Privacy and Data Security
One significant concern when it comes to scanning and sharing receipts is privacy and data security. Fetch Rewards takes these concerns seriously. As of my last update in January 2022, the app stated that they do not sell personal information and that they anonymize and aggregate data to protect user privacy.
However, it’s essential to read the app’s privacy policy and terms of service, as these can change over time. Also, consider the evolving landscape of data privacy regulations, as new laws may have been implemented since my last update.
Fetch Rewards and Shopping Trends
The link you provided mentioned that Fetch Rewards analyzes shopping trends, and this is an essential aspect of what the app does with receipts. By collecting data from thousands or even millions of users, Fetch Rewards can gain insights into broader shopping trends. They can see which products are popular in specific regions, which brands are gaining traction, and which stores are preferred by users.
This aggregated data is incredibly valuable for companies looking to make informed business decisions. It can help manufacturers understand consumer demand and adapt their product offerings accordingly. Retailers can optimize their inventory and marketing strategies, ultimately leading to better shopping experiences for consumers.
For example, if Fetch Rewards notices a surge in the purchase of organic and gluten-free products, it can signal a growing trend in health-conscious consumer behavior. Manufacturers can respond by introducing more of these products, and retailers can highlight them in their stores.
In addition to helping brands and retailers, this data also benefits Fetch Rewards users indirectly. As the app collects and analyzes shopping trends, it can provide users with more relevant and personalized offers. For instance, if a user frequently purchases organic and gluten-free products, the app may present them with exclusive discounts and promotions related to these items.
Conclusion
Fetch Rewards is not just a simple receipt-scanning app; it’s a platform that collects, analyzes, and utilizes data from receipts to benefit both users and businesses. By offering rewards to users and valuable insights to brands, manufacturers, and retailers, Fetch Rewards has created a symbiotic relationship where everyone involved benefits. However, it’s crucial to be aware of privacy and data security concerns and to stay updated on the app’s policies and practices, as they may evolve over time. So, the next time you scan a receipt with Fetch Rewards, you’ll know that you’re not only saving money but also contributing to valuable shopping trend insights.
A Profit and Loss (P&L) statement, also known as an income statement, is a crucial financial document for any business. It provides a snapshot of a company’s financial performance over a specific period, usually a month, quarter, or year. Creating an accurate and insightful P&L statement is vital for understanding the profitability and financial health of your business. In this comprehensive guide, we will walk you through the steps of creating a profit and loss statement.
Photo: freepik on freepik.com
1. Learning the Basics
Before diving into the process of creating a P&L statement, it’s important to grasp the fundamental concepts:
1. Revenue: This represents the total income generated by your business during a specific period. It includes sales, service fees, and any other income streams.
2. Expenses: These are the costs associated with running your business. They can be categorized into two main types – operating expenses (e.g., rent, utilities, salaries) and non-operating expenses (e.g., interest payments, taxes).
3. Gross Profit: Calculated by subtracting the cost of goods sold (COGS) from your revenue, this figure represents the direct profitability of your core business operations.
4. Net Profit: This is the final figure that indicates the overall profitability of your business. It is calculated by subtracting all expenses (both operating and non-operating) from your revenue.
2. Collecting Financial Data
To create an accurate P&L statement, you’ll need to gather financial data from various sources within your organization. Here’s how to do it:
Sales and Revenue: Start by collecting data on your sales, including the number of products or services sold and their selling prices. This data may come from your sales department or point-of-sale (POS) system.
Cost of Goods Sold (COGS): To calculate your gross profit, you need to determine the direct costs associated with producing your products or delivering your services. This includes materials, labor, and overhead costs. Your accounting department or inventory records can provide this information.
Operating Expenses: Identify all your operating expenses, which are the costs necessary to keep your business running smoothly. Common operating expenses include rent, utilities, salaries, marketing expenses, and office supplies. Consult your accounting records, receipts, or invoices to gather this data.
Non-Operating Expenses: Don’t forget to include non-operating expenses, such as interest payments on loans or taxes. These can significantly impact your net profit.
3. Organizing Your Data
Once you’ve collected all the necessary financial data, it’s time to organize it into categories for your P&L statement:
Revenue: Sum up all the income sources for the period in question. This should be displayed at the top of your P&L statement as your “Total Revenue.”
Cost of Goods Sold (COGS): Calculate the total cost associated with producing the goods or services you sold during the period. This will be your “Cost of Goods Sold.”
Gross Profit: Deduct your COGS from your Total Revenue to find your Gross Profit.
Operating Expenses: List and categorize all your operating expenses. You can group them into categories such as “Rent and Utilities,” “Salaries,” and “Marketing Expenses.” After listing each expense, calculate the total for each category and add them up to determine your “Total Operating Expenses.”
Non-Operating Expenses: Similarly, list and categorize your non-operating expenses, and calculate the “Total Non-Operating Expenses.”
Net Profit: Subtract your Total Operating Expenses and Total Non-Operating Expenses from your Gross Profit to find your Net Profit. This is the final figure that reflects your business’s overall financial performance for the specified period.
4. Creating the P&L Statement
Now that you have all the data organized, it’s time to construct the actual P&L statement:
1. Format: Your P&L statement should have a clean, organized format. You can use a spreadsheet program like Microsoft Excel or Google Sheets for this purpose. If you prefer a template, consider using one from the resources mentioned earlier.
2. Income Section: Start with the “Income” section, where you display your Total Revenue. This is typically the first line of your P&L statement.
3. Cost of Goods Sold (COGS): Directly below the Income section, add the “Cost of Goods Sold” category and enter the total COGS.
4. Gross Profit: Calculate and display your Gross Profit just below the COGS section.
5. Operating Expenses: Underneath Gross Profit, create a section for Operating Expenses. List each category and its corresponding total.
6. Total Operating Expenses: Sum up the totals from the Operating Expenses section and display the “Total Operating Expenses” figure.
7. Non-Operating Expenses: Add a separate section for Non-Operating Expenses, categorizing and totaling them.
8. Total Non-Operating Expenses: Calculate the sum of Non-Operating Expenses.
9. Net Profit: Subtract Total Operating Expenses and Total Non-Operating Expenses from Gross Profit to determine your Net Profit. This is the final figure on your P&L statement and is often placed at the bottom.
5. Reviewing and Analyzing Your P&L Statement
Creating your P&L statement is only the first step. To make it a valuable tool for managing your business, you need to review and analyze the information it provides:
Comparative Analysis: To gain meaningful insights, compare your P&L statements from different periods. Look for trends, such as increasing or decreasing revenues or rising costs.
Identifying Profitability Drivers: Analyze the factors that contributed to changes in revenue and expenses. For example, was a boost in sales due to a new marketing campaign, or did a spike in expenses result from increased rent?
Making Informed Decisions: Your P&L statement should guide your financial decisions. Use it to identify areas where you can cut costs, invest more, or adjust pricing strategies.
Budgeting and Forecasting: Your P&L statement can also serve as a foundation for budgeting and forecasting. By analyzing past performance, you can better plan for the future.
6. Common Mistakes to Avoid
Creating a P&L statement can be straightforward, but there are common mistakes that you should be aware of to ensure its accuracy and usefulness:
Mixing Cash and Accrual Accounting: Ensure that your P&L statement uses a consistent accounting method, either cash or accrual, throughout. Mixing them can distort your financial picture.
Not Accounting for Seasonality: Be aware of seasonality in your business. Some industries experience significant fluctuations in revenue and expenses at certain times of the year.
Misclassifying Expenses: Ensure expenses are categorized correctly. Misclassification can lead to distorted financial insights.
Neglecting Non-Operating Expenses: Non-operating expenses, such as interest or taxes, are often overlooked but can significantly impact your profitability.
Failing to Update Regularly: Your P&L statement should be updated regularly, preferably monthly, to reflect real-time financial data accurately.
Conclusion
Creating a Profit and Loss (P&L) statement is an essential task for any business owner or manager. It provides a clear overview of your financial performance, allowing you to make informed decisions, plan for the future, and understand your business’s profitability. By following the steps outlined in this comprehensive guide, you can confidently construct a P&L statement that helps you manage and grow your business. Remember, the key to success is not just in creating the statement but in interpreting and acting upon the insights it provides.
In the realm of security and safety, vigilance and diligence are of paramount importance. Ensuring the security of a facility or a sensitive area is a multifaceted task, and one crucial aspect of this is conducting end-of-day security checks. These checks are essential to ensure that a facility is secure after regular operating hours. The process of conducting end-of-day security checks typically involves using specific forms designed for this purpose. In this article, we will explore the significance of end-of-day security checks and delve into the form used to record these checks.
Photo: freepik on freepik.com
Importance of End-of-Day Security Checks
End-of-day security checks are an integral part of maintaining the safety and security of a facility, whether it’s a commercial building, a government institution, or any other sensitive area. These checks serve several important purposes:
1. Preventing Unauthorized Access: One of the primary purposes of these checks is to ensure that no unauthorized individuals have gained access to the facility after hours. Unauthorized access can lead to theft, vandalism, or other security breaches.
2. Securing Sensitive Information: Many facilities house sensitive information or equipment that needs to be protected. End-of-day checks help ensure that confidential materials or valuable assets are properly secured.
3. Fire Safety: Checking for potential fire hazards, such as unattended equipment or electrical issues, is another crucial aspect of these checks. Early detection of fire risks can prevent disastrous incidents.
4. Property Protection: The end-of-day checks also help safeguard the property itself, ensuring that doors and windows are properly secured to prevent break-ins.
5. Emergency Preparedness: By conducting end-of-day checks, security personnel can verify that emergency exits are clear, fire extinguishers are in place, and other safety measures are functional, increasing overall preparedness for potential emergencies.
6. Peace of Mind: These checks provide peace of mind for facility managers and owners, knowing that they have taken steps to secure their assets and maintain the safety of their employees and visitors.
The End-of-Day Security Check Form
To effectively document and track end-of-day security checks, a specific form is often used. This form serves as a structured tool for security personnel to record their observations and actions taken during the check. The form’s design and content may vary, but the basic components typically include:
1. Date and Time: The form should start with spaces to record the date and time when the end-of-day security check is conducted. This timestamp is critical for tracking the frequency and consistency of the checks.
2. Name of the Person Conducting the Check: The name or identification of the security personnel responsible for the check is usually recorded. This helps in accountability and ensures that a specific individual is responsible for the check.
3. Facility Information: The form may have sections to include details about the facility, such as its name, location, and any unique identifiers.
4. Checklist Items: The core of the form is a checklist of items that need to be inspected during the end-of-day check. These items may include doors and windows, security systems, surveillance cameras, fire exits, emergency equipment, and more. Each item on the checklist should have a designated space for marking “checked” or “not checked.”
5. Comments and Observations: There is usually space on the form for security personnel to make comments or note any observations. This can include details about any issues encountered during the check, such as a malfunctioning security camera or a window left open.
6. Actions Taken: If any issues are identified during the check, there should be a section on the form for recording the actions taken to rectify the situation. For instance, if a door is found unlocked, the form should document whether it was locked and by whom.
7. Signature: After completing the end-of-day check, the security personnel must sign the form, confirming that the check was conducted, and the recorded information is accurate.
8. Supervisor’s Signature: In many cases, a supervisor or manager also signs the form, providing an additional layer of accountability and oversight.
It’s important to note that the specific form used may vary based on the organization, industry, or regulatory requirements. Some industries, such as government facilities or healthcare institutions, may have more stringent standards for their end-of-day security check forms.
Sample End-of-Day Security Check Form
For a more detailed understanding of what an end-of-day security check form may look like, we can refer to the sample form provided in the document from the Center for Development of Security Excellence (CDSE). The form includes the following elements:
1. Header Information: The form begins with the title “END OF DAY SECURITY CHECK FORM” and space to fill in the facility’s name, address, and phone number.
2. Instructions: There are clear instructions provided for completing the form, including noting the date and time of the check.
3. Checklist Items: The form includes a detailed checklist with items such as exterior doors, interior doors, windows, emergency exits, security systems, and more. Each item has space for marking “OK” or “Not OK.”
4. Comments/Deficiencies: A section is included for security personnel to note any comments or deficiencies. If an item is marked “Not OK,” this is where the issue is described.
5. Actions Taken: Security personnel can specify what actions they took to address any deficiencies. For example, if a window was found unlocked, they can note that it was secured.
6. Name and Signature: The form provides space for the name, signature, and date of the person conducting the check. Additionally, there is a space for a supervisor’s name and signature, adding an extra layer of validation.
7. Date/Time: The form concludes with a section for recording the date and time of the end-of-day security check.
This sample form is an excellent example of a structured and comprehensive tool for documenting end-of-day security checks. It ensures that security personnel follow a standardized process and provides a clear record of their activities and any issues encountered during the check.
Conclusion
End-of-day security checks play a critical role in safeguarding facilities, protecting assets, and ensuring the safety of personnel and visitors. The use of a well-designed form is essential in documenting these checks systematically and accurately. The form serves as a practical tool for security personnel to record their observations, actions taken, and any issues identified during the check. By maintaining a detailed record of end-of-day security checks, organizations can enhance their security measures, address vulnerabilities, and ensure a higher level of safety and protection for their premises.